
By Clarrie Snell
Sydney Woodturners Guild
The pens may initially take a while to make, however the finished article is extremely durable with brilliant colours that are striking and pleasing to the eye.
Mixing Equipment
- 4 flexible plastic containers (bottom half of small round drink containers or drink cups).
- 6 Stirrers (old hacksaw blades, or wooden sticks).
- Eye dropper.
- Dessert spoon or measuring cup.
Safety
- Wear eye protection during the mixing procedure. The Resin Hardener, MEKP, is a dangerous substance to handle. Safety goggles should be worn during handling, as loss of eyesight is possible if MEKP comes in contact with the eyes.
Read safety instructions before using this substance. - Wear face masks with filters to suit chemicals during the mixing procedure, machining and finishing.
- Wear disposable gloves during mixing procedure.
Chemicals
- Acetone for cleaning purposes.
- Surf Board Resin (Finishing Resin GC3).
- Resin Hardener (MEKP)
- Resin colours to suit your taste.
- Vaseline (petroleum Jelly).
Mould and release equipment
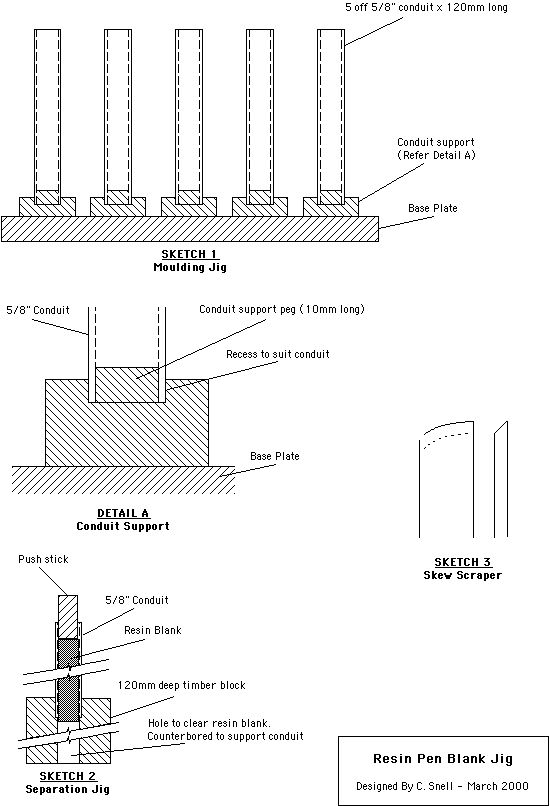
- 5 pieces 5/8 OD electrical conduit x 120mm long.
- Timber moulding jig, to support conduits (see sketch 1).
- Timber separation jig with metal drift (see sketch 2).
Preparation
- Place small amount of Vaseline onto moulding jig timber pegs and conduit supports.
- Locate conduits onto timber pegs.
Mixing Procedure
- Place 1 dessertspoon of resin into 3 plastic containers.
- Using 3 separate hacksaw blades, place a small amount of each colour into each of the 3 containers and stir thoroughly.
- Place 9 dessert spoons of resin into the remaining small plastic container .
- With another hacksaw blade, add white colour, slightly more quantity than for the smaller containers and stir thoroughly
- Add 4 drops of MEKP Hardener to each of the 3 colour containers,. Stir thoroughly.
- Add 36 drops of MEKP Hardener to the white colour container and stir thoroughly.
- Pour the contents of the three-colour containers into the white colour container, one at a time, using a circular motion onto the surface of the white resin. DO NOT STIR COLOURS TOGETHER otherwise you will have one solid colour mix and not a colour pattern that you are trying to achieve.
- With a clean hacksaw blade, gently pierce or push the colours into the white colour, just a few times, the more you pierce the more you mix the colours into the white base colour.
- Gently pour mixture into conduits.
- Curing of resin pen blanks may take about 4 hours, depending on temperature. Resin blanks will not stick to the conduits but will shrink away from the sides making it easy to push the blanks out of the conduits.
- After the blanks have cured, support conduit in separation jig. Use a steel drift to remove resin blank from conduit, (sketch 2).
Machining
- Cut resin blanks to 52mm long.
- Set lathe speed to approximately 1200rpm for drilling, turning and finishing operations.
- Place Jacob chuck into headstock and place half resin blank into chuck with about 20mm protruding.
- Drill through with 6.9mm drill, clearing drill regularly to prevent resin blank from overheating. Note 7.0mm drill will drill oversize hole for the pen brass sleeve.
- Repeat above step for other half of resin blank.
- Glue brass sleeves into pen blanks, preferably with a 2 pack epoxy glue.
- After glue has dried, face ends of resin blanks to suit length of pen brass sleeve.
- Place pen blanks onto mandrel.
- Rough turning/shaping may be carried out using a one-sided curved skew scraper, (see sketch 3), or by using 80 grit paper.
- Turn pen to desired shape with pen clip end turned to 8.1 diameter.
Finishing
- Use 240 wet and dry paper with water to remove all marks and imperfections.
- Repeat above step using 400 wet and dry paper and water.
- Finish polish using metal or car polish.
- Repeat above step. The pen should now have a high gloss finish, if not repeat step 3.
- Assemble pen.

